Modifying with Fillers
Modifying with fillers and additives makes WEST SYSTEM epoxy extremely versatile for a wide variety of bonding and coating applications.
Throughout our WEST SYSTEM instructional manuals, we refer to epoxy, neat epoxy or resin/hardener mixture meaning mixed resin and hardener without fillers added; and thickened mixture or thickened epoxy, meaning mixed resin and hardener with fillers added. Fillers are used to thicken epoxy, while additives are used to give epoxy additional physical properties when used as a coating for specific applications such as bonding or fairing.
After selecting an appropriate filler for your job (see Filler Selection Guide), use it to thicken the epoxy mixture to the desired consistency. The thickness of a mixture required for a particular job is controlled by the amount of filler added. There is no strict formula or measuring involved-use your eye to judge what consistency will work best. The chart below gives you a general guide to the differences between neat (unthickened) epoxy and the three consistencies referred to in this manual.
Always add fillers in a two-step process:
- Mix the desired quantity of epoxy resin and hardener thoroughly before adding fillers. Begin with a small batch-allow room for the filler.
- Blend in small handfuls or scoops of the appropriate filler until the desired consistency is reached (see chart below).
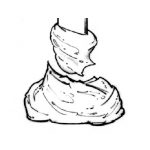
Epoxy can be thickened to the ideal consistency needed for a particular job. The procedures in this manual refer to four common consistencies: syrup, catsup, mayonnaise and peanut butter.
Modifying with Fillers
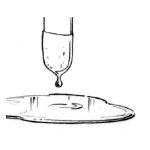
SYRUP
CONSISTENCY: Unthickened epoxy mixture
CHARACTERISTICS: Drips off vertical surfaces
USES: Coating; wetting-out before bonding; applying fiberglass, graphite and other fabrics
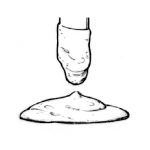
CATSUP
CONSISTENCY: Slightly thickened epoxy
CHARACTERISTICS: Sags down vertical surfaces
USES: Laminating/bonding flat panels with large surface areas, injecting with a syringe
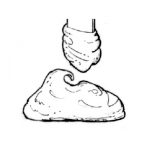
MAYONNAISE
CONSISTENCY: Moderately thickened epoxy
CHARACTERISTICS: Clings to vertical surfaces; peaks fall over
USES: General bonding, filleting, hardware bonding
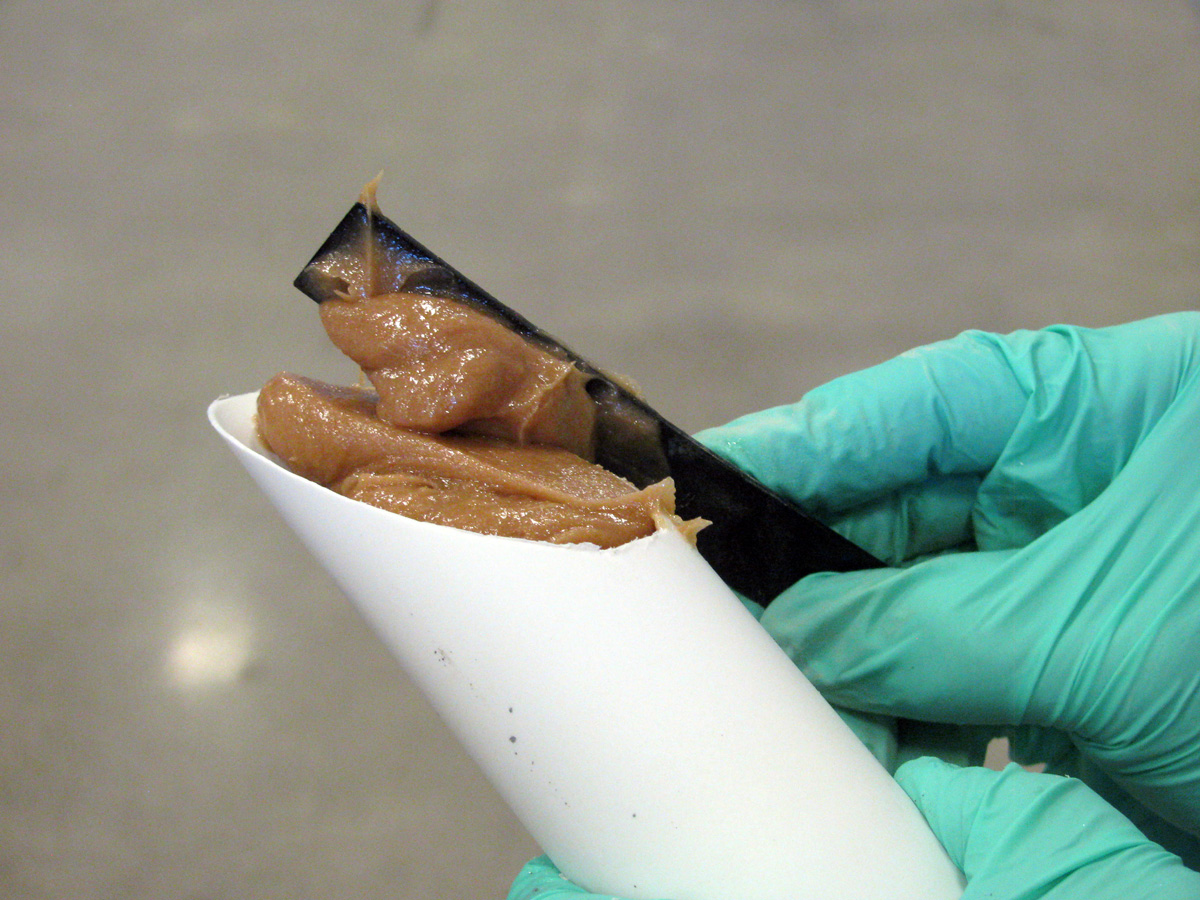
PEANUT BUTTER
CONSISTENCY: Maximum thickness epoxy
CHARACTERISTICS: Clings to vertical surfaces; peaks stand
USES: Gap filling, filleting, fairing, bonding uneven surfaces
Modifying with Additives
Additives are used to give epoxy additional physical properties when used as a coating. Although additives are blended with mixed epoxy in the same two-step process as fillers, they are not designed to thicken the epoxy (see Additives & Pigments). Follow the mixing instructions on the individual additive containers.
Mixing Thickened Epoxy in Large Batches
Mixing large batches of thickened epoxy can be messy work. Modifying with fillers can be done with a drill-motor mixer spinning at high speed tend to drive light-weight fillers into the air. Clumps of thickened epoxy are flung from the mixer during the blending process, creating a sticky mess in the area. You can minimize these problems by planning ahead and using common sense in your approach.
To prepare for modifying epoxy with fillers:
- Pick a location that is out of the way, yet near enough to offer easy access to your project and your epoxy and filler materials.
- Mask off the floor with cardboard or a plastic drop cloth. Tape the edges down to prevent tripping.
- Use a five to seven-gallon lidded plastic pail. Cut an opening in the center of the lid, just large enough for the drill motor mixer to pass through. If the mixer is a type that is flat (the modified paint roller type with extension is an example of this type), cut only a narrow slot in the center of the lid. The lid will be used to keep the lightweight filler in the bucket during mixing, so a small opening is best.
- Select a mixing paddle that is a foot longer than the mixing container is tall.
- Select a powerful drill motor for mixing thick batches. Cheap drills will burn up after mixing several batches of thickened epoxy.
- Apply wax and duct tape to the drill motor exterior to protect it during use. Triggers will likely lock up if precautions are not taken to keep the epoxy drool out. Stretch latex gloves over the handle and trigger area. Leave cooling vents uncovered so the motor can breathe. Now your equipment is ready.
Come up with a recipe
If your project calls for several batches of the same material, it is best to come up with a recipe. So much epoxy and so much filler per batch. Add measured amounts to the first batch until the viscosity suits your specific need, keeping track of the total amount added. For the remaining batches, all of the filler can be added at once, and the batches will be consistent in viscosity.
The WEST SYSTEM Technical Manual & Product Guide can help you come up with a mix recipe. Say you wanted to mix a large batch of epoxy with 403 Microfibers. The manual provides a Filler Proportion Guide that recommends two gallons of mixed epoxy and a 20-ounce container of 403 Microfibers to achieve a mayonnaise consistency. This guide includes recommendations for a variety of viscosities for each of our fillers. Keep in mind that it is just a guide. It’s a good idea to thicken the first batch in stages.
Mix a batch of thickened epoxy as follows:
- Mix the resin and hardener together thoroughly before adding fillers. Use a paddle to scrape the corners and sides.
- Add the measured amount of filler to the bucket.
- Cover the bucket with the slotted lid prepared earlier.
- Insert the mixer through the lid and into the epoxy.
- Start the mixer slowly, gradually increasing the speed.
- Move the mixer up and down and from side to side to blend the filler with the epoxy. Thick batches of epoxy will labor the motor initially as the filler starts to blend in. This will ease up as the mix becomes smooth and creamy.
- Remove the lid and mixer from the bucket.
- Scrape the corners of the bucket to blend any unthickened epoxy left there with the rest of the batch.
- Put the mixer back in and stir briefly until blended uniformly.
Remember to get the finished mixture spread out or applied quickly so that it does not overheat.
Quality control
Before mixing that big batch, consider quality control. The resin and hardener must be thoroughly mixed. We all know this but tend to forget during big projects when we’re pressed for time. This is not the place to look for shortcuts. If you don’t follow certain guidelines, a fancy electric mixer will not make up for it.—From “Big Batch Mixing Methods” by Tom Pawlak in Epoxyworks issue 9.