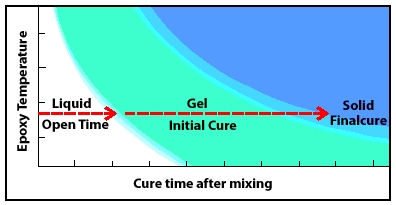
As it cures, mixed epoxy passes through a liquid state, through a gel state, to a solid-state.
Understanding epoxy chemistry is important to using epoxy safely and effectively. Mixing epoxy resin and hardener begins a chemical reaction that transforms the combined liquid ingredients into a solid. The time it takes for this chemical transformation from liquid to solid is called cure time. As it cures, the epoxy passes from the liquid state, through a gel state, before it reaches a solid-state.
Epoxy Chemistry and Stages of Cure
Stage 1: Liquid—Epoxy’s open time
Open time (also working time or wet lay-up time) is the portion of the cure time, after mixing the resin and hardener to incite an epoxy chemistry reaction, that the mixture remains a liquid and is workable and suitable to apply. All assembly and clamping should take place during the open time to assure a dependable bond.
Stage 2: Gel—Initial epoxy cure
The epoxy mixture passes into an initial cure phase (also called “the green stage” in epoxy chemistry) when it begins to gel or “kick-off.” The epoxy is no longer workable and will progress from a tacky, gel consistency to the firmness of hard rubber, which you will be able to dent with your thumbnail.
Because the epoxy mixture is only partially cured, a new application of epoxy will still chemically link with it, so the surface may still be bonded to or recoated without special preparation. However, this ability diminishes as the mixture approaches its final cure.
Stage 3: Solid—Epoxy’s final cure
The epoxy’s chemical reaction is complete. The mixture has cured to a solid-state and can be dry sanded and shaped. You should not be able to dent it with your thumbnail. At this point in epoxy chemistry, the product has reached about 90% of its ultimate strength, so clamps can be removed. It will continue to cure over the next several days at room temperature.
A new application of epoxy will no longer be chemically linked to it, so the surface of the epoxy must be properly prepared and sanded before recoating to achieve a good mechanical, secondary bond. See Surface Preparation.
You can improve epoxy’s thermal performance and reduce the potential for fabric “print-through” by applying modest heat to the epoxy after it has cured to a solid state. Contact our technical staff for more information about post curing.
Understanding Epoxy’s Cure Time
Open time and cure time govern much of the activity of building and repairing with epoxy. Open time dictates the time available for mixing, application, smoothing, shaping, assembly, and clamping. Cure time dictates how long you must wait before removing clamps, or before you can sand or go on to the next step in the project. Two factors determine an epoxy mixture’s open time and overall cure time: hardener cure speed and epoxy temperature.
Epoxy Hardener Speed
Each epoxy hardener has an ideal temperature cure range. At any given temperature, each resin/hardener combination will go through the same cure stages, but at different rates. Select the hardener that gives you adequate working time for the job you are doing at the temperature and conditions you are working under. The product guide and container labels describe hardener pot lives and cure times.
Pot life is a term used to compare the epoxy’s cure speeds of different hardeners. It is the amount of time a specific mass of mixed resin and hardener remains a liquid at a specific temperature. (A 100g-mass mixture in a standard container, at 72°F). Because pot life is a measure of the cure speed of a specific contained mass (volume) of epoxy rather than a thin film, a hardener’s pot life is much shorter than its open time.
Epoxy Temperature
The warmer the temperature of curing epoxy, the faster it cures (Figure 1). Heat speeds up epoxy chemistry or the chemical reaction of epoxy components. The temperature of curing epoxy is determined by the ambient temperature plus the exothermic heat generated by its cure.
Ambient temperature is the temperature of the air or material in contact with the epoxy. Air temperature is most often the ambient temperature unless the epoxy is applied to a surface with a different temperature. Generally, epoxy cures faster when the air temperature is warmer.
Exothermic heat is produced by the chemical reaction that cures epoxy. The amount of heat produced depends on the thickness or exposed surface area of mixed epoxy. In a thicker mass, more heat is retained, causing a faster reaction and more heat. The mixing container’s shape and the mixed quantity have a great effect on this exothermic reaction. A contained mass of curing epoxy (8 fl. oz. or more) in a plastic mixing cup can quickly generate enough heat to melt the cup and burn your skin. However, if the same quantity is spread into a thin layer, exothermic heat is dissipated, and the epoxy’s cure time is determined by the ambient temperature. The thinner the layer of curing epoxy, the less it is affected by exothermic heat, and the slower it cures.
Controlling Epoxy’s Cure Time
In warm conditions use a slower epoxy hardener, if possible. Mix smaller batches that can be used up quickly, or pour the epoxy mixture into a container with a greater surface area (a roller pan, for example), thereby allowing exothermic heat to dissipate and extending the open time. The sooner the mixture is transferred or applied (after thorough mixing), the more of the mixture’s useful open time will be available for coating, lay-up, or assembly.
In cool conditions use a faster hardener, or use supplemental heat to raise the epoxy temperature above the hardener’s minimum recommended application temperature. Use a hot air gun, heat lamp, or other heat sources to warm the resin and hardener before mixing or after the epoxy is applied. At room temperature, supplemental heat is useful when a quicker cure is desired.
Warning! Curing epoxy generates heat. Do not fill voids or cast layers of epoxy thicker than ½”—thinner if enclosed by foam or other insulating material. Several inches of mixed epoxy in a confined mass (such as a mixing cup) will generate enough heat to melt a plastic cup, burn your skin or ignite combustible materials if left to stand for its full pot life. For this reason, do not use foam or glass mixing containers or pour into confined spaces. If a pot of mixed epoxy begins to exotherm (heat up), quickly move it outdoors. Avoid breathing the fumes. Do not dispose of the mixture until the reaction is completed and has cooled.
For detailed information on working with epoxy at low temperatures, refer to Cold Temperature Bonding.
Outgassing
CAUTION! Heating epoxy that has not been gelled will lower its viscosity, allowing the epoxy to run or sag more easily on vertical surfaces. In addition, heating epoxy applied to a porous substrate (softwood or low-density core material) may cause the substrate to “out-gas” and form bubbles in the epoxy coating. To avoid out-gassing, wait until the epoxy coating has gelled before warming it. Never heat mixed epoxy in a liquid state over 120°F (49°C).
Regardless of what steps are taken to control the cure time, a basic understanding of epoxy chemistry and thorough planning of the application and assembly will allow you to make maximum use of epoxy’s open time and cure time.
For a chemist’s Q & A on epoxy chemistry, read Ask the Chemist at Epoxywork.com.