determine the number of fabric layers required to achieve a specific laminate thickness, divide the thickness desired by the single-layer thickness of the tape or fabric you intend to use.
| Product | Fabric Weight | Single Layer Thickness* |
|---|---|---|
| 740 Glass Fabric | 4 oz | .008″ |
| 742 Glass Fabric | 6 oz | .010″ |
| 729, 731, 732, 733 Glass Tape | 9 oz | .017″ |
| 745 Glass Fabric | 10 oz | .016″ |
| 727, 737 Biaxial Fabric | 17 oz | .035″ |
| 738 Biaxial Fabric with Mat | 23.9 oz | .042″ |
*Average of multiple layers applied by hand lay-up
Laminate thickness dictates laminate stiffness. Matching the thickness of the laminate you’re repairing will generally result in similar stiffness to the part you are repairing.
Fiberglass repair tips
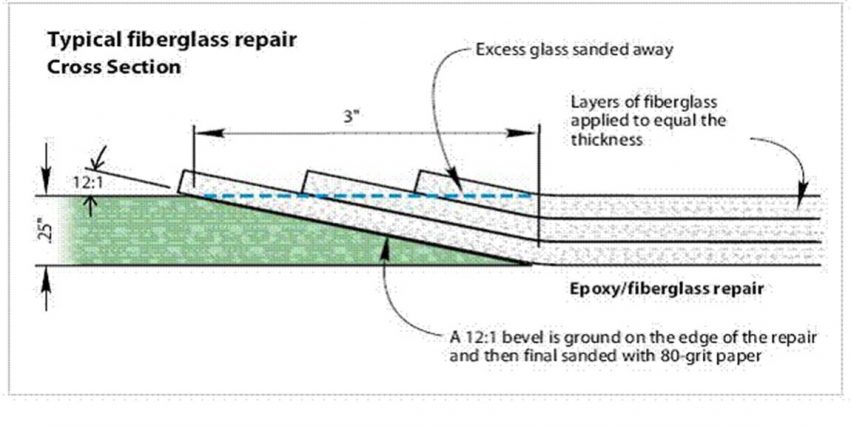
For most fiberglass repair projects, we recommend using the WEST SYSTEM 105 Epoxy Resin System for its strength and versatility. This diagram above illustrates how we recommend laminating a repair after the damaged fiberglass has been removed. It is critical that the scarf angle is set at a minimum ratio of 12:1 and that the patch thickness matches the original laminate. Matching the original thickness ensures that the stiffness will be the same as the surrounding area, reducing the chance of a crack around the repair area.
Creating a scarf angle on the original laminate helps in many ways. It provides a substantial amount of surface area for adhesion and acts as a transition zone so that the difference in properties of the new and original laminate is not concentrated at one point. We suggest a minimum 12:1 scarf ratio between the length of the scarf and the laminate thickness. This ratio applies to both skins when repairing a cored laminate.
—Excerpted from Common Errors in Fiberglass Repair by Jeff Wright, Epoxyworks 38
Beveling Fiberglass in a Transom Repair
The fiberglass thickness determines the bevel length. That is the distance from the corner to the location of the cuts for removing the fiberglass skin. As mentioned, the cut line will be located to allow the outer edge of the bevel to end before the corner of the transom. The distance of the cut line (and the bevel) back from the corner is 12 times the fiberglass thickness.
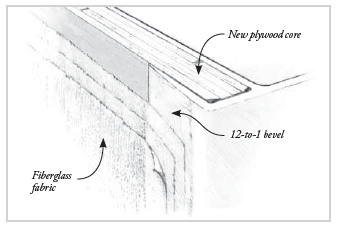
A 12-to-1 bevel allows room for multiple layers of fiberglass fabric and epoxy across the cut line to restore strength to the fiberglass skin. If the fiberglass skin is 1/8″ thick, the width of the bevel will be at least 1 ½” long. For fiberglass that is ¼” thick, the cut line will need to be at least 3″ in from the edge of the perimeter to allow for a 3″ bevel. When reusing the original fiberglass skin, the same bevel will eventually be required on each side of the cut after the skin is rebonded to the new core.
Lay out the cut line the required distance from the edge of the transom. Remember to measure from the end of the rounded corners where they blend into the flat transom surface.—Excerpted from Repairing Fiberglass Powerboat Transoms by Tom Pawlak, Epoxyworks.