Q&A SECTION
Get answers to common questions.
What Is Vacuum Bagging and Why Use It?
Vacuum bagging is a composite laminating method that uses atmospheric pressure to apply uniform clamping force across the entire surface of a layup. Unlike mechanical clamping or stapling, vacuum bagging delivers consistent pressure (even on curved or complex surfaces), resulting in thinner bond lines, fewer voids, and superior adhesive contact. This method also gives builders more control over resin content, improving fiber-to-resin ratios for stronger, lighter parts. It’s a scalable technique used everywhere from one-off repairs to large structural laminations.
Can I Vacuum Bag with WEST SYSTEM® Epoxy?
Absolutely. WEST SYSTEM 105 Epoxy Resin® can be paired with any of our hardeners—205 Fast, 206 Slow, 207 Special Clear, or 209 Extra Slow—for reliable, high-performance vacuum bagging results. The freedom to choose from four hardeners enables you to match the open time to your project’s complexity and ambient temperature, ensuring a dependable cure and a strong bond. Whether you’re working with veneers, fiberglass, or core materials, WEST SYSTEM Epoxy provides the physical properties and handling characteristics needed for professional-grade results under vacuum pressure.
Which Epoxy and Hardener Should I Use?
Choosing the right epoxy resin & hardener pairing is critical for success when vacuum bagging. Be sure to take the ambient temperature, desired working time, and desired finish into account when making your decision.
- 205 Fast Hardener®: Best for cooler temps or quick turnaround.
- 206 Slow Hardener®: Ideal for moderate temps and longer working times.
- 207 Special Clear Hardener®: Excellent for clear coating surfaces (such as wood, carbon fiber, etc.); UV-stabilized.
- 209 Extra Slow Hardener®: Designed for warm climates or complex laminations that demand extended working time.
All hardeners develop strong, resilient bonds suitable for high-pressure laminations. Watch our Hardener Selection Guide video to drill deeper into the technical details, or use our expert-built Product Selection Guide to find the right system without second-guessing.
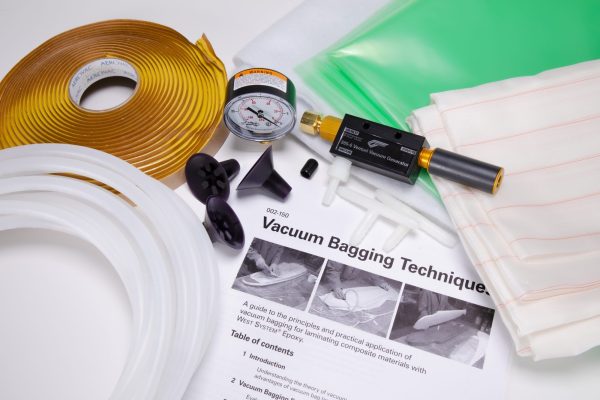
What Materials Do I Need for Vacuum Bagging?
A successful vacuum bagging setup consists of both specialized and easily sourced materials. At minimum, you’ll need:
- Vacuum pump (venturi or mechanical)
- Vacuum bag film (e.g., WEST SYSTEM 882)
- Mastic sealant (e.g., 883 Sealant) for air-tight sealing
- Breather fabric (e.g., 881) to channel airflow and absorb excess resin
- Release fabric (e.g., 879) or peel ply to allow clean removal and prep for secondary bonding
- Optional perforated film for controlling resin bleed in thin laminates
- Vacuum ports, hoses, gauge, and trap to monitor pressure and prevent contamination
Each material contributes to a controlled lamination with improved performance and surface finish. Our 885 Vacuum Bagging Kit includes everything listed above to make it easy to get started (each item can also be purchased individually).
How Do I Set Up a Vacuum Bagging Layup?
A typical layup includes the laminate stack (wet-out reinforcements and cores), release fabric, perforated film (if needed), breather layer, and the vacuum bag itself, all sealed to a mold or table. After positioning materials, seal the bag perimeter with mastic, install the vacuum port, and apply vacuum. Listen for leaks, check your gauge (aim for 12–25 Hg), and monitor the setup throughout the curing process. Thorough prep—including dry runs and clear roles for any helpers—greatly improves reliability, especially when working with short open times or large surface areas.
Is Vacuum Bagging Worth It for My Project?
If you’re building structural parts, bonding to foam or honeycomb cores, or looking to maximize strength-to-weight ratios, this method is likely your best option. It’s especially beneficial for professionals seeking consistency or DIYers upgrading from basic layups. That said, it adds a level of complexity that requires prep, practice, and the right materials & equipment. If you’re producing simple, flat laminates or working under time constraints, mechanical clamping is still a solid option. Vacuum bagging is most worthwhile when performance, reliability, and finish quality matter most.
Can Beginners Use This Technique?
Yes—but we recommend starting with small test panels. WEST SYSTEM’s vacuum bagging process is accessible thanks to our room-temperature epoxy systems and straightforward equipment options. Our Vacuum Bagging Techniques manual walks you through the process with real-world examples and troubleshooting tips. With a little practice, even first-timers can achieve consistent results that outperform traditional clamping methods.
What Are Common Mistakes to Avoid?
Some of the most common pitfalls include:
- Poor seals: Leaks of any size can compromise vacuum pressure. Treat the materials with care, and take time to test thoroughly.
- Bridging: Rigid cores or fabrics may lift from the mold corners, leading to voids. Be sure your vacuum pump can provide enough pressure to ensure full contact.
- Overuse of epoxy: Without perforated film, excess epoxy may bleed into the breather fabric. Use the right materials to control the flow rate and keep excess epoxy out.
- Too short working time: When comparing our hardener options, pay special attention to the stated “pot life” and “working time” durations. Selecting a hardener that meets or exceeds your working time needs is crucial.
- Inadequate mold prep: Porous or flexible molds can deform under vacuum pressure. Make sure your mold is built solid enough to withstand the amount of pressure you’ll be using.
EDUCATIONAL CONTENT:
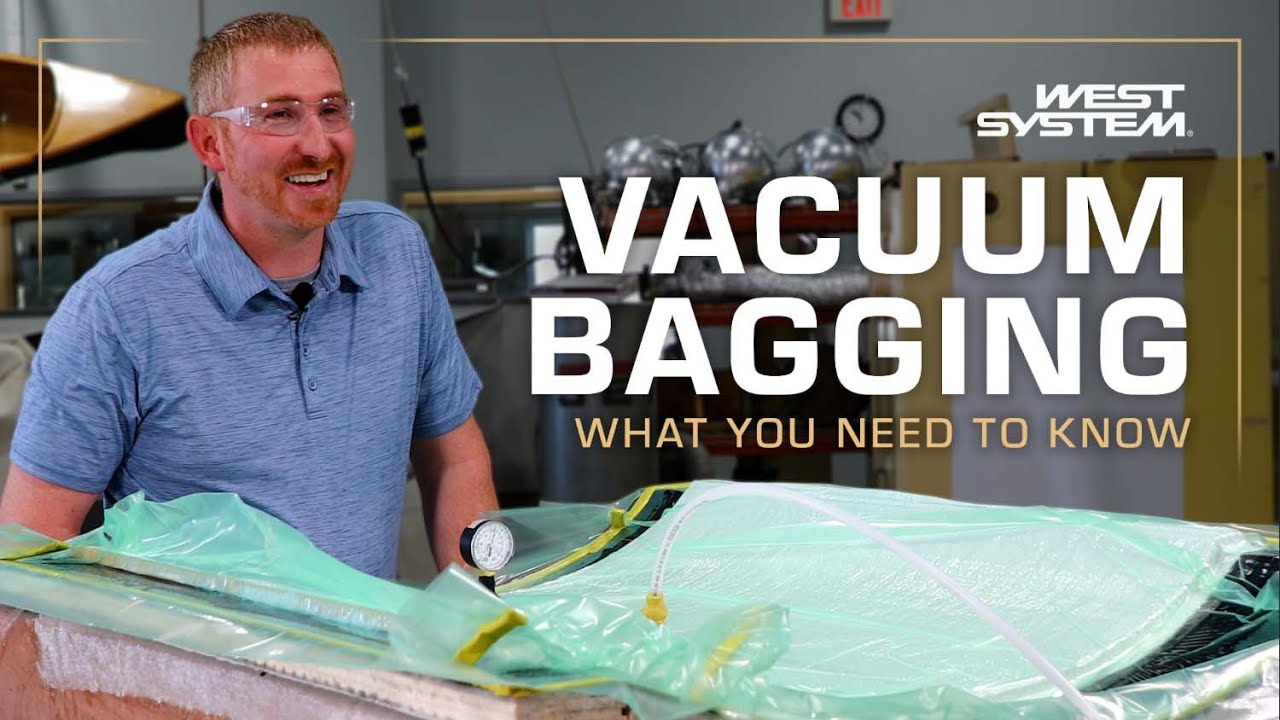
In this video, WEST SYSTEM Technical Advisor Don sets up a simple composite panel using WEST SYSTEM Epoxy to demonstrate:
● What vacuum bagging is and how it works
● Key setup considerations
● The purpose of each component
● How to properly install everything
● Vacuum pump considerations
● How to achieve optimal pressure
Watch Now!
DOWNLOAD OUR MANUAL—it’s free!
This 52-page manual describes the basic principles and practical applications of vacuum bagging for repair and/or laminate construction.

GET STARTED WITH OUR
885 Vacuum Bagging Kit
A complete starter vacuum bagging kit for room temperature repairs and small laminating projects up to 13 sq ft. Some item specifications may vary.
Learn more about VACUUM BAGGING
Explore the latest vacuum bagging projects and technical articles inside Epoxyworks, our in-house print & digital magazine! Epoxyworks is a magazine by the epoxy-obsessed, for the epoxy-obsessed, featuring building, restoration, and repair projects of all kinds. We share the latest epoxy tips and techniques direct from WEST SYSTEM and proudly showcase the incredible work of our readers. Our goal is to offer inspiration and practical tips for every epoxy project. Epoxyworks is published biannually (spring and fall).
